Wednesday, February 25, 2015

[ LAB 1.6 ] CONNECTING INTERNET USING WIRELESS IN REAL ROUTERBOARD

Assalamualaikum Wr.Wb kali ini saya akan berbagi hasil dari praktek saya tentang connecting internet using wireless

Assalamualaikum wr.wb this time I will share the results of my practice of connecting using wireless internet

A. Tujuan
   The goal is :

1. Mengetahui cara bagaimana mengkoneksikan internet menggunakan wireless dirouterboard
Knowing how to connect internet using wireless dirouterboard


B. Persiapan
   Preparation:
   1. 1 PC/Laptop
   2. Routerboard 951U-2HnD
   3. Kabel UTP
   4. Kabel Power
   5. Winbox

C. Langkah-Langkah
    Steps:

1. Matikkan virtualbox Host-Only network serta wifinya terlebih dahulu
Turn off virtualbox Host -Only network and wifi the first


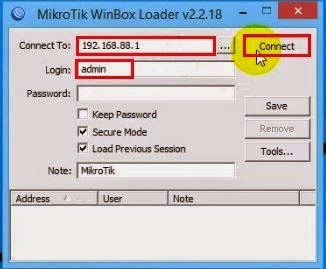
2. Buka winbox dan masuk dengan menggunakan user admin dan konek dengan mac address
Open winbox and sign in using the admin user and connect with mac address


3. Aktifkan wlannya dengan pilih wireless kemudian pilih tanda ceklis
Enable wlan to select wireless and then select the tick


4. Jika sudah aktif, selanjutnya klik dua kali pada wlannya
If wlan active , then double-click on the WLAN


5. Pilih tab menu wireless kemudian ubah mode menjadi station kemudian klik scan
Select the wireless menu tab and then change the mode to the station and then click on scan


6. Kemudian pilih wifi yang akan kita gunakkan
Then select wifi that we will use


7. Pada bagian ini hanya klik apply dan OK
In this section just click Apply and OK


8. Sekarang pilih menu security profiles kemudian pilih simbol (+)
Now select the menu of security profiles and select the symbol ( + )


9. Kemudian isi name nya sesuai keinginan kita, ceklis semua kolom yang ditandai, isi password, lalu klik apply dan ok
Then fill in the name according to our want, tick all fields marked, the contents of the password , then click apply and ok


10. Sekarang pilih menu interface kemudian klik dua kali pada wlan nya dan ganti securitynya dengan name yang telah dibuat sebelumnya, kemudian klik apply kemudian OK
Now select the menu interface and double-click on it and change its security wlan with a name that was created previously, Then click Apply and then OK


11. Untuk mengetahui apakah sudah terkoneksi atau belum, pilih registration lalu tunggu hingga muncul bacaan wlan seperti berikut ini
To know whether it is connected or not , choose the registration and wait until the readings wlan like this


12.  Jika sudah muncul tandanya sudah terkoneksi.
If it appears the sign is connected.

Mengkoneksi Laptop ke Internet

1. Pilih menu IP, kemudian pilih DHCP Client
Select the IP menu , and then select DHCP Client


2. Kemudian pilih simbol (+)
Then select the symbol ( + )


3. Ubah interfacenya menjadi wlan1 kemudian klik apply dan ok
Change the interface becomes wlan1 then click apply and ok


4. Selanjutnya pergi ke terminal, kemudian tambahkan perintah berikut yang berfungsi untuk menambahkan IP address, IP DNS, IP route, dan Firewall
Next go to the terminal , and then add the following command is used to add an IP address , DNS IP , IP route, and Firewall


5. Jika sudah menuliskan perintah tersebut, kemudian ping pada google dan Gateway
If you have typed the command, then ping on google and Gateway


6. Selanjutnya atur IP address, gateway serta DNS di IPv4 pada laptop
And then set the IP address , gateway and DNS in IPv4 on a laptop


7. Setelah atur IP PING google dan gatewaynya pada CMD
Having set the IP PING google and gateway to the CMD


8. Saat ping google dan gatewaynya terkoneksi, kita coba buka browser
When ping google and gateway connected , we try to open the browser


Thursday, February 12, 2015

[ LAB IV ] USER MANAGAMENT DAN SERVICE

Assalamualaikum Wr.Wb kali ini saya akan berbagi hasil dari praktek saya tentang User Management dan Service pada real routerboard

Assalamualaikum wr.wb this time I will share the results of my practice on User Management and Service on real routerboard

        A.   Tujuan
      The goal is:

1. Mengetahui konfigurasi service pada routerboard
     Knowing the configuration service on routerboard

2. Mengetahui service-service yang ada pada routerboard
     Knowing the services that exist on routerboard

  B. Persiapan
      Preparation:
1. Routerboard 951U-2HnD
2. Kabel UTP
3. Kabel power
4. PC/Laptop

        C.   Langkah-langkah
      Steps:

1.    Atur IP pada PC/Laptop terlebih dahulu
     Set the IP on the PC / Laptop advance


2.    Buka winbox, lalu login dengan menggunakkan admin dan IP address kemudian Connect
     Open winbox , then log in using the admin and IP address then Connect


3. Pilih menu system kemudian Identity, ini berfungsi untuk merubah nama pada routerboard
    Select the menu system then Identity, is working to change the name on routerboard


4. Pada tampilan ini, isi nama untuk routerboardnya sesuai keinginan kita, Kemudian klik apply     lalu OK
    In this view , the contents of the name to suit our desires routerboard, Then click Apply and         OK


5. Nama routerboard berhasil terganti
    Name routerboard successfully replaced


6. Pilih menu terminal untuk melihat hasil perubahan nama routerboardnya
    Select the terminal to see the results of the change of name routerboard


7. Selanjutnya pilih menu system, kemudian user pada routerboard untuk melakukan user manager user
Then select the menu system , then the user in the user manager routerboard to perform user


8. Klik symbol + pada tampilan ini
Click the + symbol on the display of this


9. Isi name nya untuk nama user dan bagian group kali ini saya pilih full
Fill in name for the user name and part of the group this time I select full


10. User Ine berhasil terbuat
Users Ine successfully made


11. Lalu klik dua kali pada admin kemudian atur IP address nya untuk user adminnya
Then double-click on the admin and then set its IP address for user admin


12. Keluar pada winbox, lalu login kembali dengan user dan Ip yang telah dibuat sebelumnya
Out on winbox , then log back in with the user and Ip has been made previously


13. Berhasil meremote
Remote succsessfull


14. IP address yang saya pakai adalah 192.168.88.4
I use the IP address is 192.168.88.4


15. Buka winbox kembali, kemudian login dengan admin dan connect dengan IP address seperti berikut

Open winbox back , then log in with admin and connect with the IP address as follows


15. Akan muncul tampilan seperti ini, karena IP address yang diizinkan sebelumnya adalah 192.168.88.4 bukan 192.168.88.2
Will appear like this , because the IP address that is allowed before 192.168.88.2  is not 192.168.88.4

16. Atur IP Addressnya menjadi 192.168.88.4 agar bisa login dengan menggunakan user admin
Set IP Addressnya be 192.168.88.4 to log in using the admin user


17. Buka kembali winboxnya, kemudian coba login dengan admin dan IP address
Reopen winbox , then try to login with admin and IP address


18. User admin sudah bisa login
Admin user can login


19. Pilih menu IP kemudian klik service
Select the IP menu and then click the service


20. Ini adalah tampilan nama-nama service yang ada pada roiuterboardnya
It is the view names of services that exist in roiuterboard


21. Sekarang coba ganti port telnet menjadi 8080 ke salah satu device kemudian apply lalu OK
Now try to change the port telnet into 8080 to one device and then Apply and OK


22. Selanjutnya klik dua kali pada bagian winboxnya, dengan atur IP sesuai keinginan yang bisa login winbox kemudian klik OK
Next double-click on the winboxnya , the IP set as you wish to be logged winbox then click OK


23. Buka aplikasi putty untuk mengakses telnet. Masukkan IP address dan portnya dengan 8080. Connect type gunakan telnet lalu OK
Open the putty application to access the telnet . Enter the IP address and port to 8080. Connect type using telnet then OK


24. Pada putty tidak bisa login, ini karena telnet port 23 diganti menjadi 8080
In the putty can not log in , this is because the telnet port 23 is changed to 8080


25. Selanjutnya mengakses diputty dengan port 8080
Furthermore, access to port 8080 diputty


26. Login dengan user dan passwordnya
Login with username and password


27. Akses pada putty port 8080 berhasil
Access to putty port 8080 successfully


28. Selanjutnya login kembali pada winbox dengan admin dan ip address lalu conect
then log back in winbox with admin and ip address and then conect


29. Pada tampilan ini, terlihat bahwa tidak bisa mengakses karena IP Address tidak diizinkan untuk akses winbox
In this view , it is seen that could not access because the IP address is not allowed to access winbox


30. Ganti IP addressnya agar bisa login pada winbox
Change the IP addresses to log in winbox


31. Selanjutnya login kembali pada winbox setelah atur IP
Furthermore, log back on after set IP winbox


32. Sekarang bisa login pada winbox karena IP sudah diatur
Winbox can now log on because the IP is set