


Assalamualaikum Wr.Wb Kali ini saya akan berbagi hasil dari praktek saya tentang Remote Mikrotik
Assalamualikum Wr.Wb This time I will share the results of my practice on Remote Mikrotik
A. Tujuan
The goal of installation is :
The goal of installation is :
1. Mengetahui cara Remote Mikrotik melalui berbagai akses, seperti:
Knowing how Remote Mikrotik through a variety of access , such as :
a. Telnet (port 23)
b. Putty (port 22)
c. Webfig (port 80)
d. Winbox (port 8291)
e. Hyperterminal (port COM)
B. Persiapan
Preparation:
1. Browser
2. Hyperterminal
3. Putty
4. Winbox
5. RouterBoard
6. PC/laptop
C. Konsep Dasar
Basic Concepts
1. Putty
Putty adalah sebuah program Open source yang dapat digunakkan untuk melakukan protocol jaringan SSH, telnet dan roglin
PuTTY is an open source program that can be used to perform network protocol SSH , telnet and roglin
2. Webfig
Webfig adalah berbasis web RouterOS utilitas konfigurasi. Hal ini dapat diakses langsung dari router dan tidak ada software tambahan yang diperlukan (kecuali web browser).
Webfig RouterOS is a web-based configuration utility. It can be accessed directly from thE router and no additional software is required (except web browser)
3. Winbox
Winbox adalah utility yang digunakan untuk konektivitas dan konfigurasi MikroTik menggunakan MAC Address atau protokol IP. Dengan winbox kita dapat melakukan konfigurasi mikrotikOS
4. Hyperterminal
HyperTerminal adalah sebuah program yang dirancang untuk melaksanakan fungsi komunkasi dan emulasi terminal.
HyperTerminal is a program designed to perform the functions of communication and terminal emulation
A. Langkah-langkah Steps to Remote MIKROTIK
1. Buka aplikasi Winbox kemudian connect dengan menggunakkan MAC Address
Open Winbox application then connects with menggunakkan MAC Address

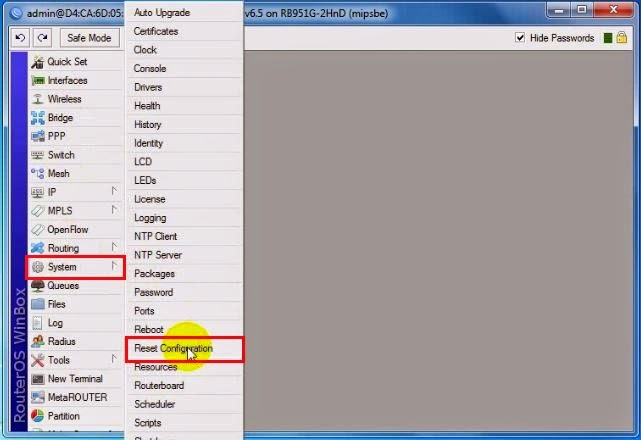
2. Selanjutnya ke System lalu kita reset Configuration untuk mengatur ulang konfigurasi RouterBoardnya
Next to the System and then we reset Configuration to reset configuration RouterBoard
3. Akan muncul tampilan seperti ini, kemudian ceklis pada bagian No Default Configuration lalu klik Reset Configuration
Will appear like this then click on the No Default Configuration and click Reset Configuration

4. Selanjutnya pilih yes untuk melanjutkan reset ulang
Then select Yes to continue reset

5. Proses mereset ulang selesai
reset process is completed

6. Pilih menu wireless untuk kita setting kemudian klik dua kali pada bagian Wlan1
Select to wireless settings menu and double-click on the wlan1

7. Setelah klik dua kali akan muncul tampilan seperti ini, kemudian kita aktifkan wifinya
After double-click will appear like this , then we activate wifi

Wifi sudah aktif
wifi is active

8. Kemudian masuk kembali, lalu pilih scan untuk membaca wifi apa saja yang aktif untuk kita pakai
Then log in back, and then select the scan to read any wifi enabled for our use

9. Akan muncul tampilan seperti ini, pilih wifi yang ingin kita gunakan lalu koneksikan
Will appear like this, select the wifi which we want to use then connect

10. Pada tampilan ini hanya perlu klik apply kemudian ok
In this view only need to click apply then ok

11. Masih pada pengaturan wireless, pilih security profiles kemudian klik tanda +
Still on the wireless settings , select security profiles and then click the +

12. Jika wifi menggunakan password kita atur seperti ini, jika sudah apply kemudian ok
if wifi using the password you set up like this , if it apply then ok

13. Pada interface wlan nya kita klik dua kali lagi
In interface we double-click again wlan

14. Pada bagian security profiles kita ubah menjadi profile1 lalu apply kemudan ok
On the security profiles we change into Profile1 then apply then ok

15. Selanjutnya kita atur bagian IP nya dengan memilih menu IP kemudian pilih DHCP client
Next we set the IP section by selecting the IP menu and then select the DHCP client

16. Klik simbol +
Click symbol

17. Kemudian akan muncul tampilan berikut, pada bagian interface ubah menjadi wlan1 kemudian apply dan ok
Then display the following, at the interface change to wlan1 then apply and ok

18. Secara otomatis akan mendapatkan IP address nya
It will automatically obtain its IP address

19. Sekarang pergi ke terminal untuk kita ping google, apakah sudah terkoneksi atau belum
Now go to the terminal for the ping google , whether it's connected or not

20. Kembali lagi pada menu IP kemudian kita pilih address
Back again on the IP menu and then we select the address

21. Pilih simbol +
select symbol +

22. Isikan IP sesuai keinginan, kali ini saya menggunakkan IP /24. Pada Interface isi dengan ether2 kemudian apply dan ok
Fill in the IP as you want , this time I’m using IP / 24 . At the interface with the contents ether2 then apply and ok

23. IP sudah berhasil dibuat, berikut tampilannya
IP has been successfully established , the following zoom

24. Masih pada menu IP, tetapi kali ini kita ke bagian firewall
Still on the IP menu , but this time we are all part of the firewall

25. Kemudian kita pilih NAT lalu klik simbol +
Then we select NAT and click the symbol +

26. Pada general interfacenya pilih wlan1
In general interface select wlan1

27. Sekarang ke bagian Action lalu pilih Masquerade kemudian apply dan ok
Now to the Action and select Masquerade then click apply and ok

Menggunakan WEBFIG
Via WEBFIG
1. Keluar dari winbox, kemudian sambungkan wifi di pc/laptop dengan koneksi yang sama pada winbox
Out of Winbox , then connect wifi on your pc / laptop with the same connection on winbox

2. Atur IP addressnya pada IPV4 seperti berikut
Set the IP address in IPv4 as follows

3. Jika sudah berhasil atur IP buka web browser lalu masukkan IP address yang sebelumnya telah diatur
If you have successfully set the IP open a web browser and enter the IP address that has been set

4. Kemudian kita login sebagai admin dan masukkan passwordnya
Then we login as admin and enter the password

5. Berikut ini adalah tampilannya pada WEBFIG
Here is how it looks on WEBFIG

Menggunakan TELNET
Via TELNET
1. Aktifkan Telnet Client. Pertama Ke control panel dahulu lalu pilih Programs
Enable Telnet Client . First go to the control panel first and then select Programs

2. Kemudian pilih Turn Windows Features on or Off
Then select Turn Windows Features on or Off

Checklist on Telnet Client for us activating

4. Kemudian ok, lalu akan muncul tampilan loading seperti ini tunggu hingga selesai
Then ok , then the display will appear like this loading wait until finish

5. Sekarang ke CMD lalu masukkan perintah Telnet<spasi>IP yang telah dibuat
Now go to CMD and enter the Telnet command <space > IP that has been made

6. Selanjutnya login dengan User Admin dan passwordnya yang telah dibuat lalu enter
Advanced login with User Admin and the password that was created and then enter

7. Meremote mikrotik pada CMD berhasil
Remotely Mikrotik on CMD successfull

Menggunakan PUTTY
Via PUTTY
1. Buka aplikasi putty, masuk dengan IP address sebelumnya kemudian klik save lalu open
Open putty application , enter the IP address previously then click save and then open

2. Seperti biasa, login sebagai admin dan masukkan password
As usual , login as admin and enter the password

3. Kita sudah berhasil meremote dengan PUTTY
Already managed remotely with PuTTY

4. Pada putty kita coba ganti password mikrotiknya dengan masukkan perintah password
In putty we try to change the password to enter the password command Mikrotik

5. Kemudian coba login diwinbox dengan password yang baru
Then try to log in with the new password in winbox

6. Jika muncul tampilan seperti ini berarti berhasil
If the display appears like this means successfully

Menggunakan HYPERTERMINAL
Via HYPERTERMINAL
1. Seperti biasa masukkan usernya sebagai admin lalu OK
As always enter as an admin user should then OK

2. Setelah itu masukkan IP address dan port number
After that, enter the IP address and port number

3. Seperti biasa, login sebagai admin dan masukkan password
As usual , login as admin and enter the password

4. Remote mikrotik berhasil dijalankan
Remote mikrotik successfully executed

Demikian sharing hasil tutorial dari saya tentang meremote mikrotik dengan real RouterBoard
so sharing the results of my tutorial on remotely proxy
with RealBoard

