


Assalamualaikum Wr.Wb kali ini saya akan berbagi hasil dari
praktek saya tentang cara mematikkan/menyalakkan IPv6, memperbaharui/menurunkan
versi, menambahkan paket, serta Installasi ulang menggunakan netinstall pada
routerboard Mikrotik
Assalamualaikum wr.wb this time I will share the results of
my practice on how to turn off / turn on IPv6 , update / downgrade , added package , as well as re- installation using NetInstall on Mikrotik routerboard
A. Tujuan
The goal of installation is:
1. Mengetahui bagaimana cara mematikkan/menyalakkan IPv6 ,
memperbaharui/menurunkan versi, menambahkan paket, serta Installasi ulang
menggunakan netinstall pada routerboard Mikrotik.
Knowing how to turn off / turn on IPv6 , update / downgrade
, adding the package , as well as re- installation using NetInstall on Mikrotik
routerboard.
B. Persiapan
Preparation:
1. PC/laptop
2. Routerboard
3. Kabel
UTP
4. Kabel
Power/Power cable
5. Winbox
6. Netinstall
C. Langkah-langkah
Steps:
1. Matikkan
koneksi Virtualbox dan wirelessnya pada control panel seperti berikut
Turn off/disable Virtualbox and their wireless connections on
the control panel as follows

2. Atur IP address IPV4 pada pc/komputer
Set the IP address IPV4 on pc / computer

3. Hubungkan kabel UTP dan kabel powernya pada routerboard,
hubungkan kabel UTP pada port 2 lalu ke PC
Connect the UTP cable and its power cord on routerboard ,
connect the UTP cable on port 2 and then to the PC

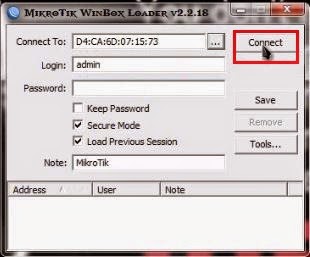
4. Buka aplikasi winbox kemudian login dengan admin dan connect
menggunakan mac address kemudian klik connect
Open the winbo application and login with the admin winbox and connect
using the mac address then click connect

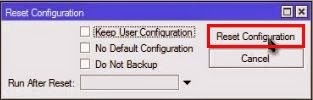
5. Reset configurationnya lalu rebot untuk memunculkan IP dan
bisa melakukan login dengan IP addres
Reset configuration then rebot to bring IP and could do login with IP address


6. Buka kembali aplikasi winboxnya, kali ini kita login dengan
admin dan menggunakkan IP address, kemudian klik connect
Open the winbox application again, this time we login
to the admin and use the IP address, then click connect


7. Sehabis mereset ulang konfigurasi biasanya akan muncul
tampilan seperti ini, kita hanya perlu klik ok
After resetting the configuration will usually appear like
this, we just need to click ok

Mengaktifkan IPV6
Enabling IPv6
1. Buka menu system kemudian package
Open the menu system and then package

2. Selanjutnya klik enable untuk mengaktifkan
Then click Enable to enable IPV6

3. Jika sudah selanjutnya reboot
If it's the next reboot


4. Selanjutnya cek kembali pada system kemudian package untuk
melihat apakah IPV6 sudah enable
then check back on the system then the package to see if
IPv6 is enabled

Memperbaharui Versi Routerboard
1. Pastikkan dahulu versi routerboard saat ini untuk kita perbaharui
First make sure that the current version routerboard for us to renew

2. Unduh Npk RouterOS nya pada http://www.mikrotik.com atau bisa juga di http://www.routeros.co.id tetapi
sebelumnya saya sudah mendownload jadi saat ini hanya perlu disalin saja
Download Npk his RouterOS on http://www.mikrotik.com or it
could be in http://www.routeros.co.id but before I 've downloaded so now only
need to be copied only

3. Paste pada menu file winboxnya dengan mengklik simbol seperti berikut
Paste the menu file winbox by clicking on the following symbols

4. Proses menyalin npk sedang berjalan
Npk copy process is running

5. Npk berhasil disalin
Npk successfully copied

6. Selanjutnya reboot
Then reboot


7. Kemudian login kembali pada winbox dengan menggunakan IP
addressnya
Then login back on winbox using IP address

8. Kemudian cek versi terbarunya pada system apakah sudah
terganti atau belum
Then check the latest version on the system if it is
replaced or not

9. Versi berhasil diperbaharui
Successfully updated version

Menurunkan Versi Router
Downgrade Version Router
1. Salin npk versi sebelumnya pada winbox
Copy npk previous version in winbox

2. Kembali ke menu file untuk paste file npk nya dengan klik
simbol seperti berikut
Back to the file menu to paste the file npk by clicking the
following symbol

3. Proses menyalin npk sedang berjalan
Npk copy process is running

4. Menyalin npk berhasil
Copy npk successfully

5. Tahap selanjutnya ke system lalu package
The next phase of the system to package

6. Selanjutnya pilih downgrade, karena kita akan menurunkan
versi routernya
The next phase of the system to select downgrade, because we would downgrade the router

7. Cek kembali apakah versinya sudah terganti atau belum
Check to be sure that the version has been replaced or not


Menambahkan Paket User Manager
Adding User Package Manager
1. Sama
seperti sebelumnya, salin dahulu npk user managernya apabila sudah download.
Jika belum silahkan download dahulu pada www.mikrotik.com
atau www.routerous.co.id
Same as before , first copy the user npk manager when they
are downloaded . If not please download first on www.mikrotik.com or
www.routerous.co.id

2. Buka pada menu file kemudian salin npk user managernya
Open the File menu and then copy the user npk manager

3. Proses menyalin npk user manager sedang berjalan
The process of copying the user npk manager is running

4. Npk user manager berhasil disalin
Npk user manager successfully copied

5. Kemudian jika sudah cek pada system lalu package
Then if it is a check on the system package

Installasi Ulang Menggunakkan Netinstall
Re- Installation Using NetInstall
1. Pertama pilih menu system kemudian routerboard untung mengatur routerboardnya
First select the menu system then routerboard to set
routerboard

2. Pilih setting untuk melanjutkan mengatur routerboard
Select settings to continue set routerboard

3. Lalu akan muncul tampilan seperti berikut, atur boot
devicenya menjadi try-ethernet-once-then-mand, kemudian klik apply dan ok
Then will appear as follows , set the boot device's into
try- ethernet -once -then- mand , then click apply and ok

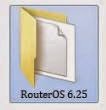
4. Buat folder tersendiri untuk npk router-mipsibe-6.25.npk.
saya akan memakai router 6.25 karena saat ini saya menggunakan router 5.26
Create a separate folder for npk - mipsibe - 6.25.npk
router . I will use a router 6:25 because now I use a router 5:26
5. Buka aplikasi netinstall, kemudian klik browse. Jika belum ada silahkan unduh
dahulu pada www.mikrotik.com
Open NetInstall application, then click browse. If no please download first
on www.mikrotik.com

6. Pilih folder yang berisi npk yang telah dibuat
Select the folder that contains npk that have been made

7. Jika sudah, pilih net booting untuk kita atur IP nya
If it's , select a netbooting to be set its IP

8. Selanjutnya akan muncul routerboard yang kita gunakkan,
kemudian ceklis bagian routeros-mipsibe nya, kemudian install
Next will come routerboard we gunakkan , then tick -
mipsibe routeros his part , then install

9. Jika muncul bacaan done, berarti tahap installasi selesai
If appears reading done , means of the installation is
complete

Keterangan masalah
Troubleshooting
Pada saat di netinstall routerboard tidak terdeteksi,
silahkan lakukan cara berikut ini:
At the moment in the NetInstall routerboard not detected ,
please do the following:
1. Pindahkan
kabel UTP dari Ethernet 1 ke Ethernet 2
Move the UTP cable from the Ethernet 1 to Ethernet 2

