


Assalamualaikum Wr.Wb kali ini saya akan berbagi hasil dari praktek saya tentang backup and restore pada routerboard
Assalamualaikum Wr.Wb this time i will share the results of my practice of backup and restore using realrouterboard
A. Tujuan
The goal is:
1. Mengetahui konfigurasi backup dan restore di CLI
knowing how to configuration backup and restore in CLI
2. Mengetahui konfigurasi backup dan restore menggunakan kata sandi
Knowing how to configuration backup and restore using the password
B. Persiapan
Preparation:
1. PC/Laptop
2. Kabel UTP
3. Routerboard 951U-2HnD
C. Langkah-Langkah
Steps:
1. Lakukan konfigurasi yang berkaitan dengan backup dan restore terlebih dahulu, bisa dicek pada http://ineshintyadewi.blogspot.com/2015/02/lab-16-connecting-internet-using.html
Perform related configuration backup and restore in advance , can be checked on http://ineshintyadewi.blogspot.com/2015/02/lab-16-connecting-internet-using.html
BACKUP AND RESTORE TANPA PASSWORD
1. Login dengan menggunakan mac address dan user admin
Login by using the mac address and user admin
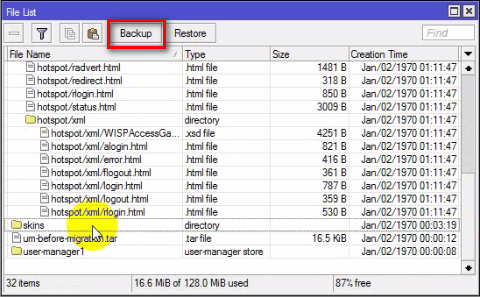
2. Jika sudah masuk pada winbox, pilih menu File kemudian pilih backup

3. Saat pilih backup, lalu akan muncul tampilan fie backup secara default kemudian pilih backup kembali
When select the backup , then will appear the backup file by default and then select the backup back
4. Berikut adalah hasil dari backup

5. Pindahkan atau copy file mikrotik tersebut ketempat lain
Move or copy the files to another place
6. kemudian hapus file backup yang ada pada routerboardnya
then delete the backup files that exist on routerboardnya

7. Atur ulang semua konfigurasi yang ada pada routerboard dengan pilih menu system lalu pilih reset configuration
Reset all existing configuration on routerboard to select the menu system and select reset configuration
8. Klik bagian no default, ini bertujuan agar routerboard benar-benar bersih dari semua konfigurasi kemudian klik reset
Click the part no default , the goal for routerboard completely clean of all the configuration and then click reset
9. Login kembali dengan menggunakan mac address dan admin lalu klik connect
Login back by using the mac address and admin then click connect
10. Kita buat IP agar saat login kita bisa menggunakkan IP bukan mac address
We make IP so that when we can login using IP instead of mac address
We make IP so that when we can login using IP instead of mac address

Click the symbol ( + ) to add the IP

12. Isi IP address sesuai keinginan kita, lalu ganti interface menjadi ether 2 kemudian klik apply dan OK
Fill in the IP address according to our want , then replace the interface into the ether 2 then click apply and OK
13. Buka menu files kembali
Open the Files menu back

14 Salin kembali file backup mikrotiknya pada menu files
. Copy the mikrotik backup file to files menu again

15. Klik file backup mikrotiknya kemudian klik restore
Click the mikrotik backup file then click restore

16.Selanjutnya akan muncul tampilan berikut, klik restore
Next will display the following , click the restore
17. Setelah klik restore, akan muncul untuk diminta reboot klik yes
After click restore , would appear to be asked to reboot click yes
18. Masuk kembali dengan menggunakkan IP dan admin
Log back in by using IP and admin

19. Coba lakukan PING pada google
Try to do PING on google
20. Lakukan PING google juga pada laptop/PC

Backup (.backup) Dengan Enskripsi
Backup ( .backup ) With Encryption
1. Hapus file backup yang sebelumnya telah dikonfigurasi
Delete backup files that have previously been configured
Delete backup files that have previously been configured


2. Jika sudah terhapus file backupnya kemudian klik backup
If you've deleted the backup file and then click the backup
3. Masukkan nama file dan isi passwordnya kemudian klik backup
Enter a file name and password then click the backup contents
4. Pada tampilan ini akan terlihat file backup secara enskripsi telah dibuat

5. Lalu kita klik file backupnya lalu kita salin pada tempat lain
Then we click then we copy the files backed up in another place
6. Kemudian paste file backupnya
Then paste the backup files
7. Pilih menu system lalu klik reset configuration
Select the menu system and then click reset configuration
8. Klik bagian no default, ini bertujuan agar routerboard benar-benar bersih dari semua konfigurasi kemudian klik reset
Click the part no default , the goal for routerboard completely clean of all the configuration and then click reset
19. Klik yes
Click yes

Restore File Backup (.backup) Enskripsi
1. Sama seperti sebelumnya, hapus file backupnya
Just as before , delete the backup files
2. Salin kembali file backup yang sebelumnya telah disalin
Copy the backup file back before been copied
3. Paste kan pada menu filesnya
Paste it on the menu files

4. Klik restore untuk mengembalikan semua konfigurasi sebelumnya
Click Restore to restore all previous configuration
5. Masukkan password yang telah dibuat sebelumnya, kemudian klik restore
Enter the password that has been made before, then click restore
6. Selanjutnya secara otomatis akan dimintai reboot, kemudian klik yes
Furthermore automatically be asked to reboot , then click yes
7. Masuk kembali dengan menggunakan IP addres dan admin kemudian connect
Login back with the IP addresses and the admin then connect
8. Jika sudah masuk, pilih menu terminal kemudian ping Google
If you have login, select the terminal and then ping Google

Backup Dengan Script (.rsc)
Backup with Script (.rsc)
1. Buka terminal kembali
Open the terminal back

2. Selanjutnya masukkan perintah seperti berikut ini
Next enter the following command
3. Setelah menuliskan perintah file print akan terlihat file yang sudah di backup dengan ekstensi .rsc
After typing the command will print the file visible already in the backup file with the extension .rsc
Back in the File menu , here are already visible backup file with the extension .rsc

5. Salin file backup tersebut pada laptop/pc
Copy the backup file on the laptop / pc
Then reset the system menu and then reset konfiguration

7. Klik bagian no default, ini bertujuan agar routerboard benar-benar bersih dari semua konfigurasi kemudian klik reset
Click the part no default , the goal for routerboard completely clean of all the configuration and then click reset

Restore File Backup Script (.rsc)
1. Drag file backup nya pada notepad, kemudian ubah pada bagian IP addressnya menjadi 11.11.11.1/24 dan networknya menjadi 11.11.11.0 kemudian simpan
Drag its backup file in notepad , and then change the IP addresses become part 11.11.11.1/24 and networknya be 11.11.11.0 and then save
2. Selanjutnya atur IP pada pc/laptop yang sudah diubah pada notepad sebelumnya
Furthermore, set the IP on your pc / laptop that has changed in the previous notepad
3. Masuk kembali pada winbox tetapi dengan menggunakkan mac address dan admin
Login back on Winbox but with using mac address and admin
4. Pilih menu files kemudian hapus file backupnya
Select the files menu and then delete the files backed up
5. Salin file backup yang telah dikonfigurasikan sebelumnya pada notepad
Copy the backup file that is preconfigured to notepad
6. Tampilan ini terlihat file berhasil disalin dari pc/laptop

7. Selanjutnya ke menu terminal, lalu restore dengan perintah seperti berikut
Next to the terminal menu , and then restore with a command like the following
8. Diatas terlihat Ip address yang sudah diubah melalui notepad berhasil
Above shows Ip address that has been converted through successful notepad
Demikian hasil tutorial dari saya~

