


Contoh domain :
* blogspot.com
* google.com
* facebook.com
Sedangkan subdomain adalah domain cabang bagian dari domain induk. Biasanya, subdomain ada di depan domain dan dipisah dengan titik ( . ).
Contoh subdomain :
* googleblog.blogspot.com
* mail.google.com
* m.facebook.com
* warna hijau adalah domain induk (utama), sedangkan warna merah adalah subdomain
Bagaimana cara kerja nya?
1. Buka menu administrative tools kemudian pilih active directory user and computers
1. Open the menu and then select administrative tools active directory user and computers
2. Kemudian klik icon yang mirip seperti orang yang fungsinya untuk menambahkan user yang akan digunakan pada saat join domain

3. Kemudian masukkan biodata user yang ingin kita buat, jika sudah klik next
3. Then enter the user biographical data we want to make, if it is click next
4. Masukkan password user, kemudian ceklis bagian "password never expires" kemudian klik next

5. Pembuatan user baru telah selesai
6. kembali pada menu administrative tools kemudian pilih dns
6. back on the administrative tools menu and select dns
7. Kemudian klik kanan pada domain lalu pilih new host untuk membuat host baru
7. Then right-click on the domain then select the new host to create a new host
8. Isikan nama host dan IP addressnya sesuai dengan IP address client

9. Host baru selesai dibuat

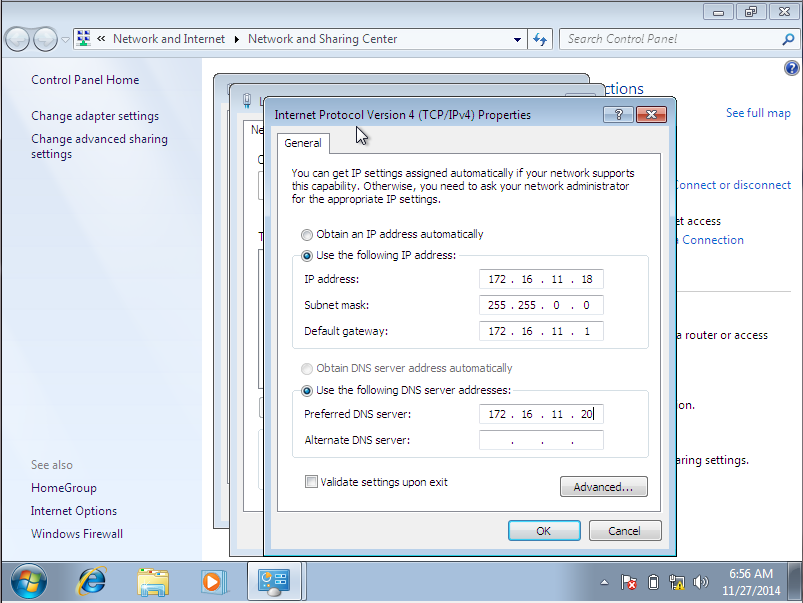
10. Kemudian kita atur IP pada client dengan membuka control panel lalu network and sharing center kemudian klik local area connection
10. Then we set the IP on the client by opening the Control Panel and then Network and Sharing Center and then click the local area connection
11. Klik properties
11. Click properties

12. Pilih Internet protocol version 4
12. Select Internet protocol version 4

13. Kemudian atur IP nya
13. Then set the IP
11. Click properties

12. Pilih Internet protocol version 4
12. Select Internet protocol version 4

13. Then set the IP
14. Selanjutnya buka control panel pada client lalu ke system and security kemudian klik change settings
14. Then open the control panel on the client and then to the security system and then click change settings
15. Then click change
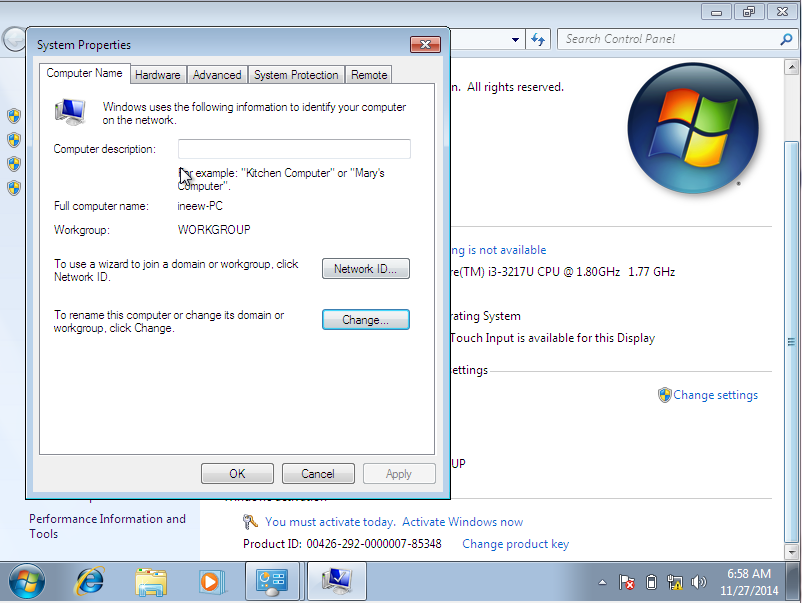
16. Pilih domain, kemudian isikan nama domain yang kita inginkan
16. Select the domain , and then fill in the domain name that we want
16. Select the domain , and then fill in the domain name that we want

17. Selanjutnya masukkan user dan password yang telah dibuat sebelumnya
17. Next enter the username and password that has been created before

18. Join domain berhasil dilakukan
18. Join domain successful

19. Setelah berhasil join domain secara otomatis akan dimintai restart
19. After successfully join domain will automatically be asked to restart
19. After successfully join domain will automatically be asked to restart


20. Tekan ctrl+alt+del

21. Selanjutnya masukkan password user
21. Next enter the user's password
21. Next enter the user's password


22. Selanjutnya cek pada control panel lalu network and internet dan network and sharing center apakah join domain benar berhasil atau tidak
22. Further checks on the control panel and network and internet and network and sharing center if properly managed domain join or not
Demikian hasil praktek tutorial saya tentang domain dan subdomain
So the result of my tutorial practice on Domain and subdomain

